Back Extension Machine and Back-Pain Prevention

A back extension machine—often called a hyperextension bench or Roman chair—is a common gym tool used to train the posterior chain, meaning the muscles along the back side of your body. When it’s set up correctly and used with controlled form, it can help build core stability, strengthen the erector spinae (the long muscle group that runs along your spine), and support better movement patterns for daily life and training.
This matters because a “strong core” is not only about visible abs. It also includes the muscles that support the spine and help you stay stable while lifting, carrying, bending, and twisting. When the posterior chain is weak or poorly coordinated, people often compensate with poor mechanics, which can lead to recurring discomfort over time.
That said, back extensions are not a “push through pain” exercise. They should feel like muscle work, not sharp pain, pinching, or electric symptoms down the leg. If symptoms feel nerve-like, or if you have a known spine condition, it’s smart to get guidance from a qualified clinician before loading this movement.
What the Back Extension Machine Does (and Why It Works)
Most back extension machines are built so you can hinge at the hips while your feet and lower legs are supported. Your torso lowers forward, then extends back up smoothly and in control. This trains the body to produce force through the hips while the trunk stays braced.
Depending on the style of equipment, you may see:
- 45-degree hyperextension bench (classic “Roman chair” style)
- 90-degree Roman chair (more upright torso angle)
- Seated back extension machine with a weight stack (you sit and extend backward against resistance)
Main muscles trained
Back extensions can activate several important muscles, including:
- Erector spinae (spinal extensors that help you stay upright)
- Glutes (hip extension and pelvic support)
- Hamstrings (assist hip extension and control the lowering phase)
- Deep core stabilizers (bracing to keep the spine steady)
Some equipment is also designed to be adjustable, so you can change the pad position and body angle. This can shift emphasis slightly between the lower back and hips.
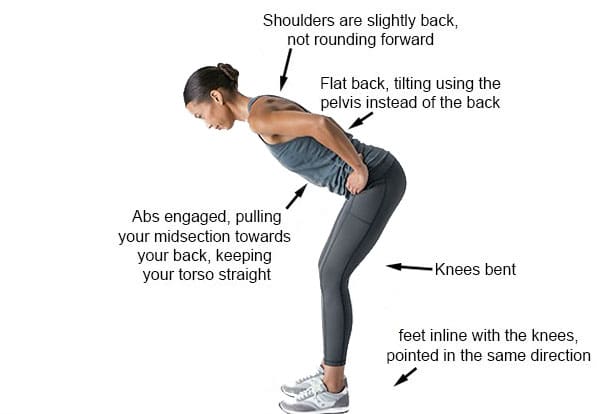
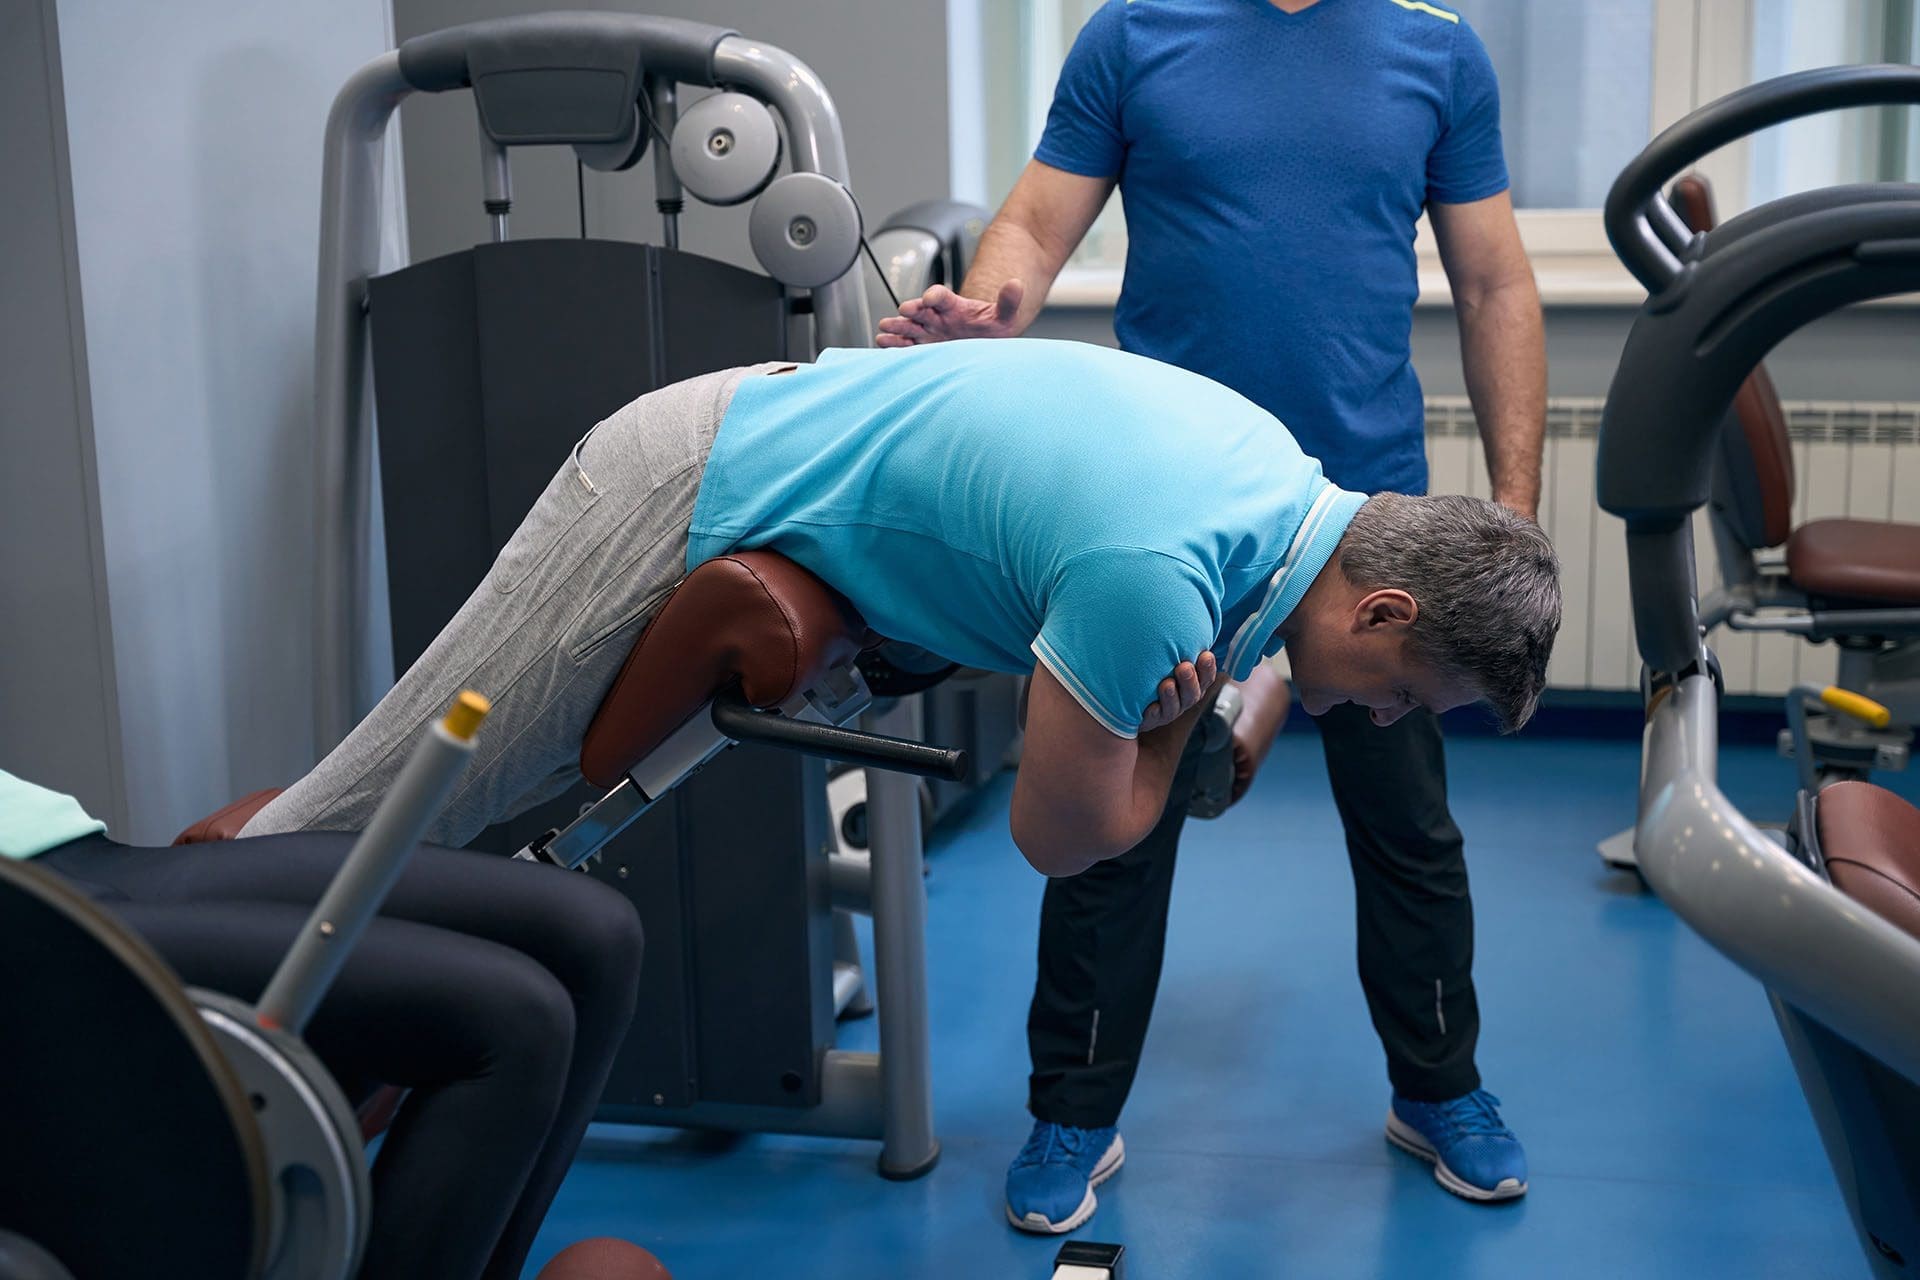
Quick Setup: How to Adjust the Pads and Foot Holds
Good setup is not optional—it’s the difference between a safe hip hinge and an awkward spine bend.
Use these checkpoints:
- Hip pad height: The top of the pad should sit at or just below the front of your hip bones so your hips can hinge freely.
- Feet secured: Heels supported and feet locked into the restraints so you feel stable before you move.
- Body line: At the top position, aim for a straight line from head to tailbone (not a “crunched” posture).
- Machine adjustability: If you’re using an adjustable unit, choose a setting that fits your leg length and hip position (many benches offer multiple pad angles/heights).
A simple clue: if you feel like you’re bending mostly through the low back instead of hinging through the hips, your setup is probably off.
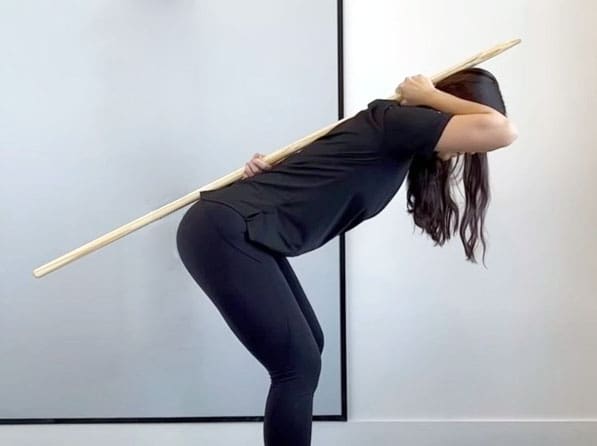
Step-by-Step: How to Do Back Extensions with Neutral-Spine Form
Below is a clear, repeatable method that works for most healthy lifters using bodyweight or a light load.
Brace before you move
- Set your feet and hips as described above.
- Cross your arms over your chest (or put your hands at your sides if you already have strong control).
- Take a breath and gently brace your midsection like you’re preparing to be bumped.
Hinge down (controlled lowering)
- Think: “hips back”, not “round forward.”
- Lower your torso until you feel a strong stretch in the hamstrings and glutes.
- Keep the neck neutral (eyes looking slightly down).
Drive up with glutes and hamstrings
- Squeeze your glutes and bring your torso back up.
- Stop when your body is straight (neutral), not leaning back.
Avoid hyperextension at the top
- The finish is “tall and braced,” not “arched hard.”
- If you feel low-back compression at the top, reduce the range or lighten the load.
WebMD also describes back extensions as a movement pattern that should be approached with attention to form and comfort, especially when people use extension-based exercises for their backs.
Common Mistakes (and Easy Fixes)
These are some of the most common issues seen in the gym and in rehab-style strength work.
- Mistake: Bending through the lower back instead of hinging at the hips
Fix: Adjust the pad so the hips can hinge freely; keep ribs “down” and brace. - Mistake: Swinging or using momentum
Fix: Slow down the lowering phase (2–3 seconds down) and pause briefly. - Mistake: Hyperextending at the top
Fix: Stop at neutral alignment; think “straight line,” not “lean back.” - Mistake: Going too heavy too soon
Fix: Start with body weight and perfect control, then gradually add load.
Smart Programming: Sets, Reps, and Progression
A back extension machine can be used for strength, stability, or rehab-style rebuilding—depending on how you program it.
Beginner (control + tolerance)
- 2–3 sets of 8–12 reps
- Bodyweight only
- Rest 60–90 seconds
General fitness (posterior chain support)
- 3 sets of 10–15 reps
- Add a small plate or dumbbell hugged to the chest if form stays clean
Strength focus (only if form is rock-solid)
- 3–5 sets of 6–10 reps
- Heavier load, slower tempo
- Stop sets before form breaks down
A practical equipment note: many Roman chair benches and back extension units are adjustable to accommodate different body sizes and training angles, helping people find a safer hinge position.
When to Be Careful (Red Flags and Modifications)
Back extensions are not for “everyone, all the time.” Use extra caution or professional guidance if you have:
- Pain that shoots down the leg, numbness, tingling, or weakness
- A known disc injury that flares with extension-based movements
- New or worsening pain after starting the movement
- History of significant spine trauma
Options that may be safer (depending on the person) include:
- Shorter range of motion
- Isometric holds in a neutral position
- Glute-focused hip extension variations where the spine stays braced
On Dr. Alexander Jimenez’s site, hyperextension is discussed as a movement that can help strengthen muscles but should be matched to the person’s needs, especially when low back pain is involved. The key theme is using exercise alongside appropriate clinical care and progressions.
How Integrative Chiropractic Care and Nurse Practitioners Can Complement Back Extensions
Strength work is powerful—but many people do best with a complete plan, not a single exercise.
Chiropractic care: improving motion and reducing irritation
In an integrative setting, chiropractic care may focus on:
- Restoring joint motion and spinal mechanics
- Reducing stiffness that changes hinge patterns
- Supporting better movement timing between the hips, pelvis, and spine
Some chiropractic sources also describe a whole-person approach that pairs adjustments with movement habits and supportive care.
Nurse practitioner support: whole-body factors that affect pain and healing
Nurse practitioners (NPs) often add value by addressing factors that can keep people “stuck,” such as:
- Sleep, stress load, and recovery capacity
- Inflammation drivers and nutrition basics
- Medication review and safer pain-management planning when appropriate
- Screening for red flags that require imaging or referral
In other words, exercise strengthens tissue capacity, while clinical oversight helps remove barriers that sustain pain patterns.
The integrative “bridge” between rehab and performance
A practical integrated approach often looks like this:
- Improve movement quality first (mobility + hinge mechanics)
- Build strength with controlled exercises (like back extensions)
- Progress to more demanding patterns (lifting, carrying, athletic training)
This “combined plan” concept—pairing adjustments, targeted exercise, and individualized care—is also described in integrated therapy-style chiropractic articles focused on building a personalized plan that includes spinal work and strengthening.
Clinical Observations from Dr. Alexander Jimenez, DC, APRN, FNP-BC
Across Dr. Jimenez’s educational content, a consistent clinical message is that many back-pain patterns are not solved by a single tool. People tend to do better when they:
- Restore motion where it is limited
- Reinforce stability and strength where it is weak
- Progress exercise choices based on symptoms and tolerance (not ego)
- Combine training with clinical evaluation when pain persists
His hyperextension-focused series emphasizes how extension-related patterns can connect to low back symptoms and how exercise progressions may support strengthening when used appropriately.
He also discusses core- and squat-related strengthening as part of a broader strategy for back and hip function—important because hip strength and trunk control are major parts of how a back extension machine should be performed (hinge + brace).
Putting It All Together: A Simple, Comprehensive Plan
Here’s a clean way to combine gym training with integrative clinical care.
Step 1: Reset the basics (1–2 weeks)
- Gentle mobility for hips and mid-back
- Short-range back extensions (bodyweight only)
- Focus on bracing and controlled tempo
Step 2: Build capacity (3–6 weeks)
- Increase back extension reps slowly (example: add 1–2 reps per week)
- Add glute and hamstring accessories (bridges, hinges, split squats)
- Add walking or light conditioning for circulation and recovery
Step 3: Progress to real-world strength (ongoing)
- Add load to back extensions only if the neutral form is automatic
- Transition strength to compound lifts and carries when appropriate
- Maintain a weekly “spine hygiene” routine (mobility + stability)
If pain is persistent or complex, the integrative model is often used to evaluate movement, address joint mechanics and irritation, strengthen intelligently, and support recovery systems.
Key Takeaways
- The back extension machine (Roman chair/hyperextension bench) strengthens the erector spinae, glutes, and hamstrings, supporting core stability when done with control.
- Proper setup matters: align the pad for a true hip hinge, brace the core, and avoid “cranking” into the low back.
- The goal is neutral at the top, not hyperextension.
- Integrative care can help by improving motion, reducing irritation, and guiding progressions—while NPs support recovery, whole-body drivers, and safety screening.
References
- 4 Benefits of A Back Extension Machine
- The 10 Best Back Extension Machines
- Back Extension Guide: How to Do Machine Back Extensions
- How to Do Back Extensions
- The Back Extension Machine Exercise: The Definitive Guide
- Back Extension Machine: How To, Tips, Variations, & More
- Adjustable Back Extension Machine & Roman Chair (CB-13)
- Integrating Therapies for Enhanced Back Pain Relief
- Chiropractic Exercises Back Extensions
- Discover How Chiropractic Adjustments Relieve Back Pain
- Unbelievable Ways Chiropractic Adjustments Relieve Back Pain
- An Overview Of Hyperextension On The Body (Part 1)
- Various Hyperextension Exercises For Back Pain (Part 2)
- Back & Hip Pain: Squats, Core, Chiropractic Care for Relief
- Instagram Reel: Coach Tanner Shows How to Use the Back Extension Machine
- YouTube Short: How to Use the Back Extension Machine
- YouTube: Back Extension/Back Extension Machine
- Dr. Alex Jimenez: El Paso, TX Doctor Of Chiropractic